Tag Archives: craft

Christmas Decor: Floating Ornaments

Christmas Decor: Floating Ornaments | Revamperate Christmas Decor: Floating Ornaments | RevamperateEvery day, it feels more and more like Christmas as I see more decorations going up at home, at work and everywhere else. I just wish it weren’t going by so quickly! I’m happy to say I’m almost done with holiday shopping though, so I’ll just give myself a little pat on the back. Considering I’ve worked in retail for the last FIVE Christmases, I am happy to stay away from the malls this time of year. As inviting as the sales are, I don’t miss the craziness of holiday shoppers stressing me out. That being said, I’m totally looking forward to my (hopefully) last round of holiday shopping this weekend. Renegade Craft Fair is coming back to LA this weekend, so you know where I’ll be!

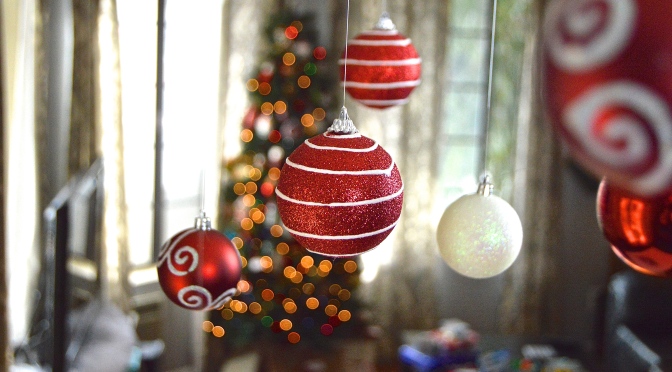
Anyway, if you’re still looking for easy dollar decor for the holidays, look no further. These floating ornaments will cost you almost nothing! You’ll need:

  • Clear fishing line
  • Clear thumbtacks
  • Plastic Christmas ornaments
  • Scissors

It’s probably as easy as you’d expect – purchase several ornaments from a dollar store (usually sold in bulk for a dollar) in different colors or patterns that match your holiday decor. You can also buy large packs of complementing ornaments from stores like Target for pretty cheap.

Cut several varying lengths of clear fishing line, ranging from 1-3 feet depending on your home. Tie one end of the line tightly to the ornaments and the other to thumbtacks, and pin them to your ceiling about 6 inches apart in no particular pattern. Keep the ornaments hanging at varying lengths and several inches apart for best results.Christmas Decor: Floating Ornaments | Revamperate Christmas Decor: Floating Ornaments | Revamperate
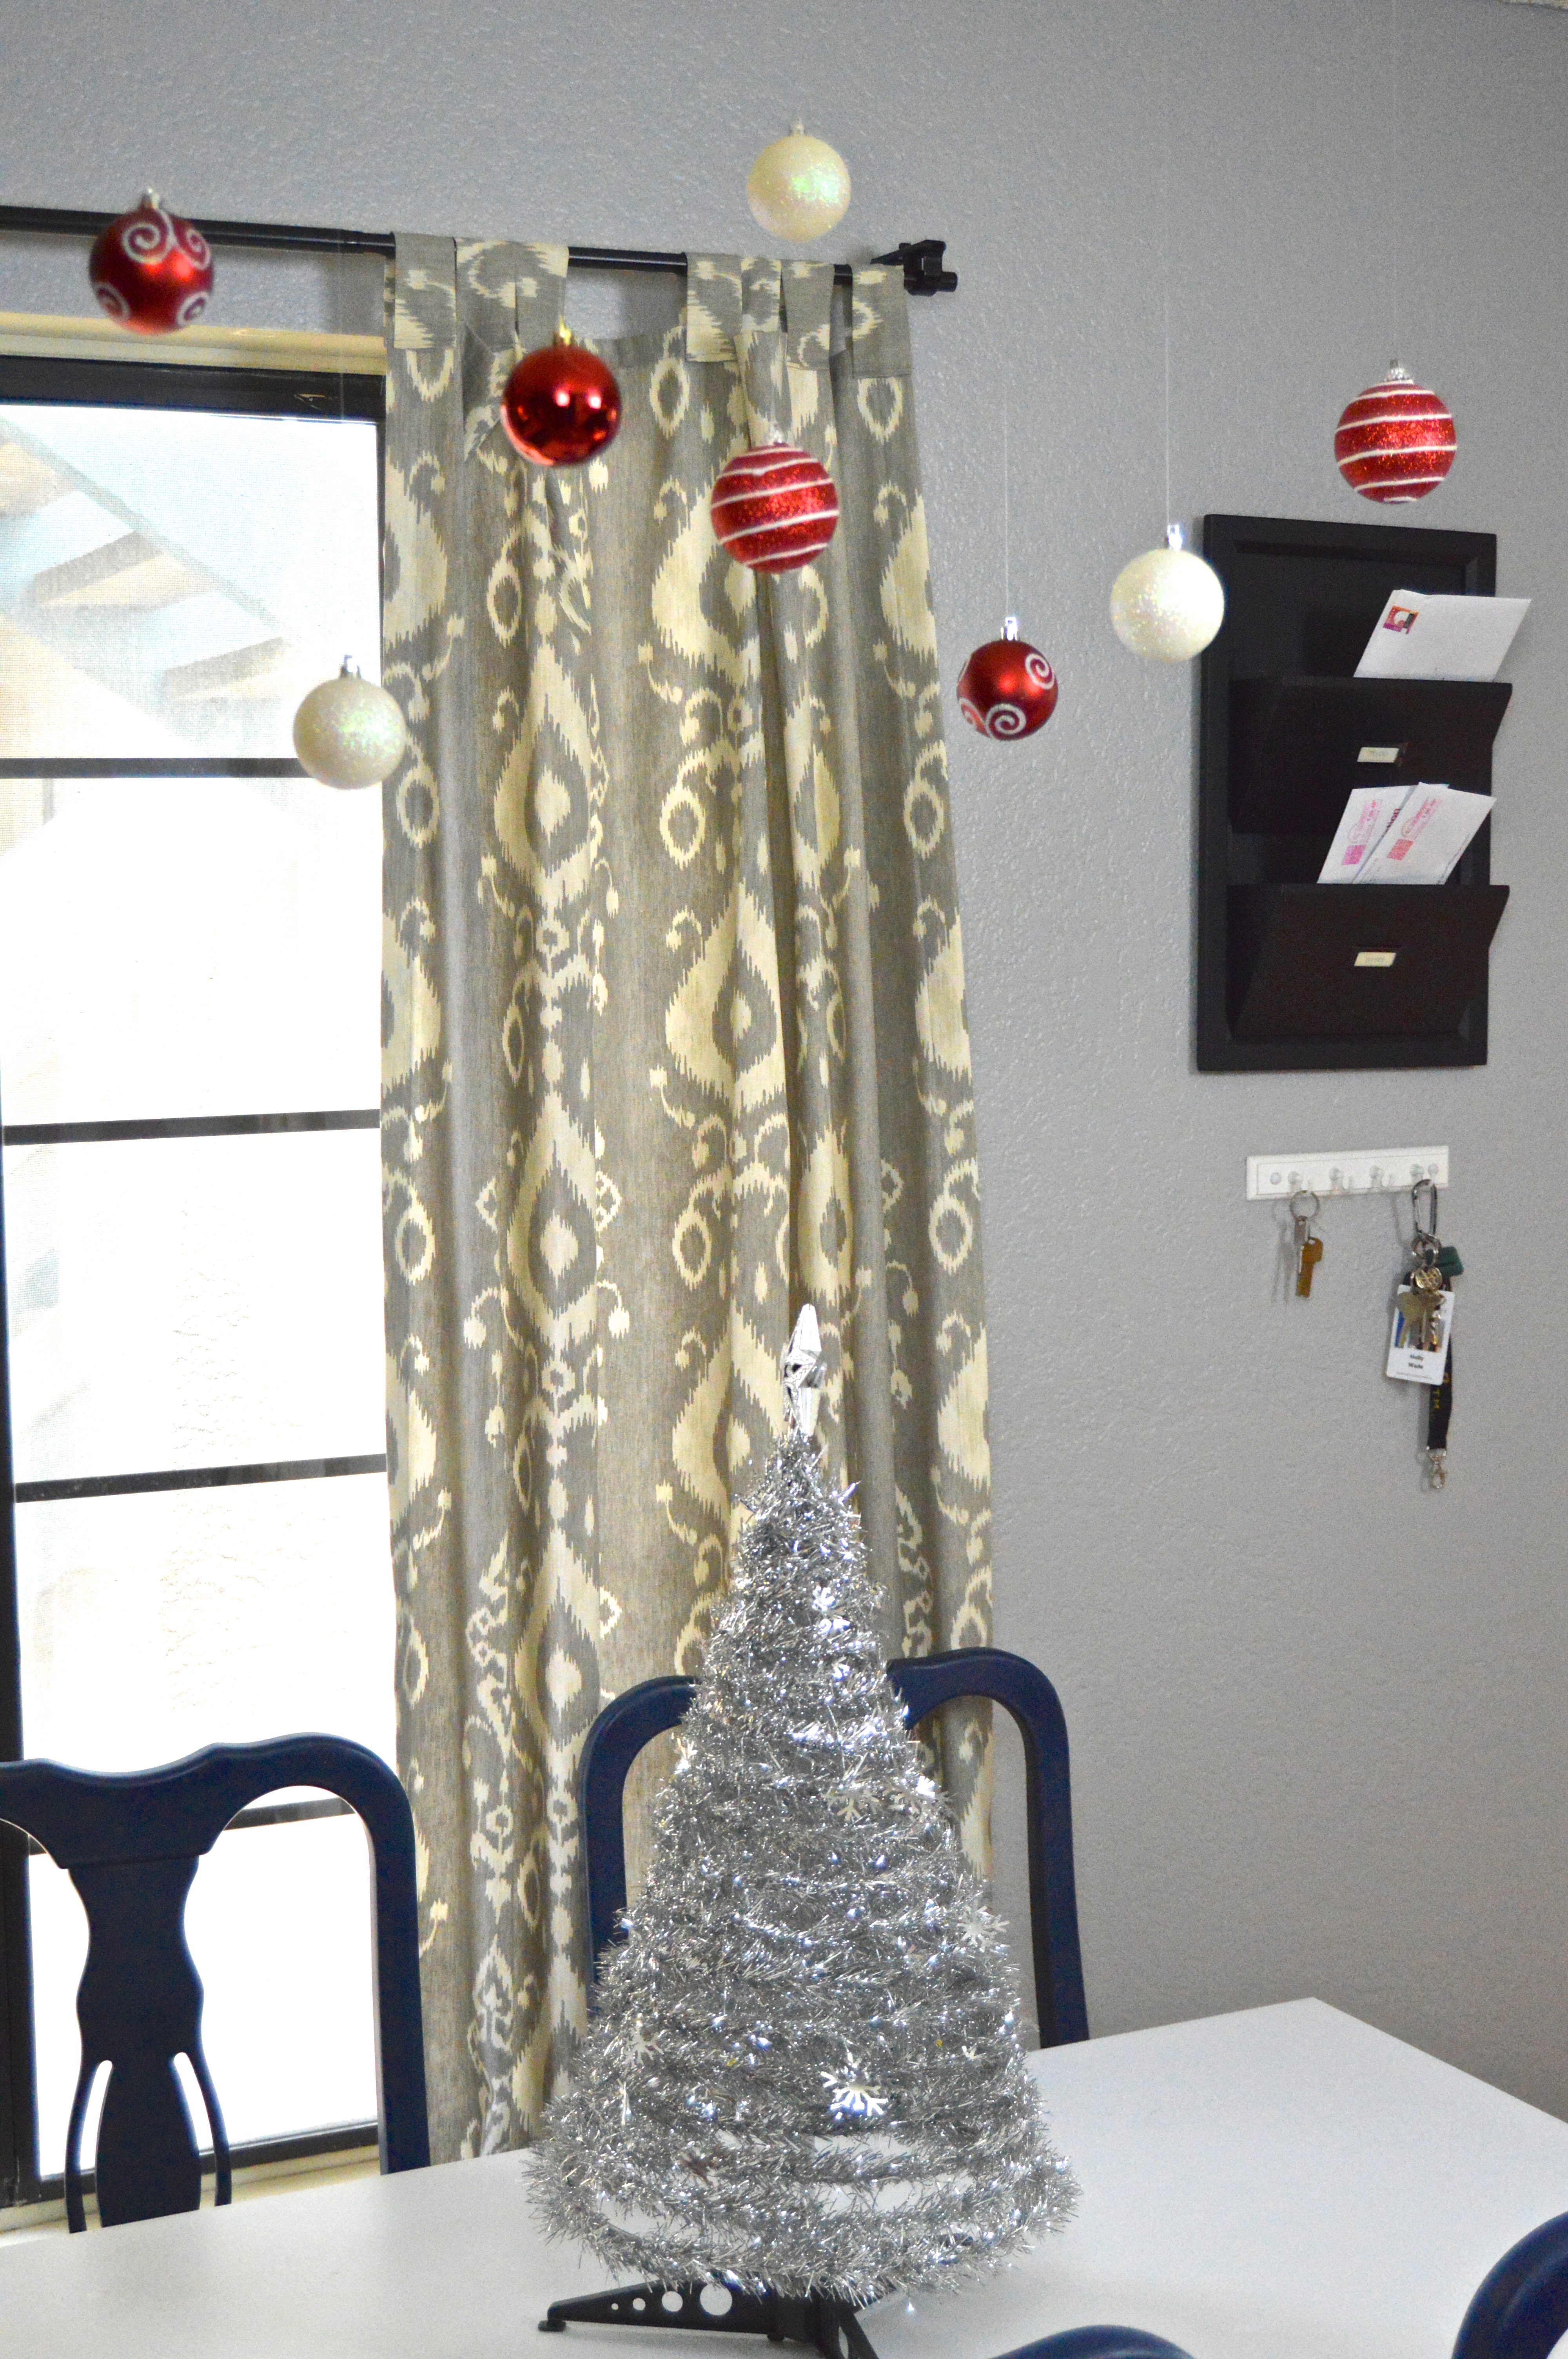
I hung these ornaments above my dining room table, acting as a type of centerpiece in an area where I had less holiday decor. I also had to take into account the fact that I have a cat who loves to jump on my tables and counter tops, so I didn’t want the balls hanging too low. These would also look pretty in a corner, perhaps with longer strings, or you could hang them in your window if you have a short overhang to stick the thumbtacks.

Have fun with it and enjoy decorating for Christmas! After all, you only get to do this once a year.

Feather Glass Christmas Ornament

DSC_1213 DSC_1210Homemade Christmas ornaments open up a new world of opportunities. OK, that sounds dramatic. Really though. Those clear glass ornaments give you an endless amount of options – you can fill them, paint them, glue things to them. The world is your oyster.

I know it seems weird for me to be so dramatic about Christmas ornaments, but you get my point, right? With just a couple dollar store glass ornaments, you can create so many things, and here’s one of them: fill a glass ornament with feathers.

Yes, it’s that simple. Cut feathers down to size if necessary and carefully maneuver them into a glass ornament, using your finger or a pen to move them around inside of the orb until you reach your desired look. Then pop the metal cap on and use a piece of ribbon to tie a bow around it for hanging.DSC_1205This incredibly easy ornament makes a wonderful Christmas gift or would look lovely on your own tree. You can also personalize it with a silver or gold Sharpie marker or even a little puffy paint on the glass. No would would ever guess that it is so quick, cheap and easy. Enjoy!

DIY Bottle Cap Macaron Christmas Ornament

Bottle Cap Macaron Christmas Ornament | Revamperate Bottle Cap Macaron Christmas Ornament | Revamperate Bottle Cap Macaron Christmas Ornament | RevamperateIt’s finally feeling like Christmas in my little apartment, and I’m enjoying every second of it! Filling up the Christmas tree isn’t hard to do with my growing collection of ornaments, but you can never really have too many ornaments, right? This year, Andrew and I combined our ornament collections (talk about commitment!) and filled up the tree pretty nicely, but that wasn’t about to stop me from making even more. My family has a tradition that every year for Thanksgiving, we hold an ornament exchange, so my collection grow exponentially every year – mostly with cat and owl ornaments. They know me so well!

Well, I wanted to share a few easy ornament DIYs this month that make both excellent gifts and great tree fillers for those empty spaces on your tree. This one goes out to all of the foodies and especially the macaron lovers! Making this ornament will take you about 5 minutes – as long as it takes to heat up a glue gun.Bottle Cap Macaron Christmas Ornament | RevamperateYou’ll need:

  • 2 bottle caps (twist off are better because they are not dented)
  • Paint and a paintbrush
  • Glitter (that compliments the paint color)
  • Glue gun
  • Ribbon

First, paint both bottle caps while your glue gun heats up, and paint a second coat once the first has dried. Use the glue gun to glue both ends of the ribbon to the inside of one bottle cap, leaving a 2-inch loop for the ornament to hang from. Then carefully glue around the inside of the bottle cap and secure the other bottle cap to it, insides facing each other. At this point, the glue shouldn’t be showing. Once cooled enough to touch, slowly glue around the crack between the bottle caps and sprinkle glitter on it before it dries. Because the glue hardens quickly, you can also do this in separate pieces. Slow is better and will keep it looking clean! Let it dry and pull off any glue strings. Then you’re ready to go!Bottle Cap Macaron Christmas Ornament | Revamperate Bottle Cap Macaron Christmas Ornament | RevamperateHang this macaron ornament on your free or give it as a gift to the macaron-lover in your life. Enjoy!

DIY Envelope Advent Calendar

DIY Envelope Advent Calendar | Revamperate DIY Envelope Advent Calendar | RevamperateAs a kid, I always looked forward to December, knowing that my mom always had an advent calendar with a chocolate or other treat for every day of the month. Having an advent calendar (and having the Christmas tree up the whole month) made it feel like Christmas lasted so much longer. This truly is my favorite time of year, and now that it’s finally December 1st, I feel like it’s finally appropriate to share almost an entire month of Christmas DIYs and recipes. Get ready for it!

Advent calendars aren’t just for kids anymore – I made this one to hang on our wall with a piece of candy for Andrew or I to enjoy every day (because adults love candy too). This is a pretty easy advent calendar DIY, and it will be easily collapsable and reusable in coming years.

You need:

  • 8 very thin, 12-inch wooden dowels
  • Thick string
  • 24 small envelopes
  • Large number stamps
  • 2 different colored stamp pads
  • 24 clothes pins
  • Candy (or other type of small treat)

DIY Envelope Advent Calendar | Revamperate DIY Envelope Advent Calendar | Revamperate DIY Envelope Advent Calendar | RevamperateFirst, tie the string in a knot around the end of one wooden dowel. Then wrap the string around it several more times, tie it again and let out about 3-4 inches of strong before repeating the process with another dowel. You want to leave enough room for an envelope to hang between each layer and tie the string about a half inch from the end of the dowel. Repeat as you go down the layers, tying 8 dowels together with room in between. Then it gets a little tougher…

Use the same steps to tie together the opposite ends of the dowels. Measure as you go, and hold up the top dowel to make sure you leave even spacing in between the dowels. After all, you don’t want your calendar to hang crookedly. When you reach the end, cut a one foot long piece of string, and securely tie each end to the top dowel. This will be what your calendar hangs from, so make sure you’ve tied it extra tight.

Use your stamps to stamp large numbers on the front of the envelope bags in alternating colors – I chose red and white against my brown envelopes. You can also use small bags instead of envelops – mine were more envelope-like. I found all of my items at Michaels (you can see similar stamps here or small bags here).DIY Envelope Advent Calendar | Revamperate DIY Envelope Advent Calendar | RevamperateUse the clothespins to hang the envelopes so that about three will fit on each dowel. Most likely, you will have to clamp the bag directly on the dowel to ensure it will hold once it has some weight in it. Put a piece of candy or other type of treat in each bag and hang it on a wall or door. It adds to your Christmas decor and offers a fun way to countdown to Christmas!

I’m so excited to share more Christmas DIYs in the coming weeks. Stay tuned!

Halloween Treat: Eyeball Cupcake Toppers

DSC_1043 DSC_1038Happy Halloween, everyone! In need of a last minute Halloween treat? Well, this one will only take a few minutes and can be found at the Dollar Store.

Try dressing up your cupcakes this year with eyeball cake toppers. Made of what, you might ask? Ping pong balls!

All you need is:

  • Pack of ping pong balls (from the Dollar Store)
  • Blue and black paint
  • Red Sharpie
  • Small paintbrushes

Use a small paintbrush to make a small black circle in the middle of the ball, outlined with a blue circle and then another circle of black to create the iris of the eye. Let the paint dry and paint a second coat until you’re satisfied with the color. Note, you might need more coats because the paint can come out pretty light.

Once all the paint is dry, use a red Sharpie to make creepy veins coming out from the iris of the eye. When the color has set, top these creepy little eyeballs on top of your cupcakes for a spooky Halloween treat!DSC_1077 DSC_1063These are extremely easy to make in big batches, so they’re the perfect creepy themed treat for big get-togethers. Enjoy!

Pineapple Halloween Costume

DSC_0934 DSC_0938If you’re down to the last minute and still looking for a Halloween costume to wear this weekend, I’ve got you covered with a super easy and super adorable pineapple costume. Now, before I tell you how to make this, I have to tell you the story behind it because every time I told someone I was going to be a pineapple for Halloween this year, they looked at me like I was crazy.

If you’re a How I Met Your Mother fan (which you all should be!), you might remember the pineapple incident…you know, that time Ted woke up with a horrible hangover, a random girl next to him and a pineapple on his nightstand. Well, that story wasn’t actually resolved until after HIMYM actually completed its final season. You can watch more on that moment here.

Anyway, Andrew and I were trying to think of good couples costumes for Halloween this year, but most of our ideas were coming up short because, let’s face it, it’s expensive to acquire certain pieces for Halloween costumes that you probably won’t wear again. I joked that we could be Ted and the pineapple, which I thought was pretty darn brilliant, but it was tough to figure out a Ted costume for Andrew. In the end, I stuck to my pineapple idea and Andrew decided to be a “hanging chad” with me, which was Ted’s Halloween costume for many years. So here it is in all of its glory – an extremely easy pineapple costume!

Here’s what you need:

  • Yellow dress
  • Brown sharpie
  • Ruler
  • Green cardstock
  • Toilet paper roll
  • Scissors
  • Clear glue
  • Headband
  • Wire and wire cutters

First, acquire a yellow dress if you don’t already have one, which I did not. I scrounged one up from the clearance racks at Forever 21 for only $6 (score!). If this is a dress you don’t plan to wear again like mine, use a brown sharpie and a ruler to draw crossing lines on the top part of the dress. It’s a lot easier that trying to draw on the entire dress because of the shape of the skirt.

Once that’s done, cut several varying sizes of leaves from your cardstock. I wanted mine to be tall but have lots of smaller leaves around it, so I cut about eight pieces total in different sizes and then glued them in layers around a toilet paper roll. Once you’re satisfied with the layers, use your fingers to carefully roll down the tips of the leaves to give them some details (trust me, it makes a difference).DSC_0968Using something sharp like a safety pin or tack, poke small holes on both sides of the toiler paper roll (now covered in paper). The holes should be across from each other about 1/4 inch from the base. Cut two pieces of wire about 3 inches long, and thread each one through the holes, wrapping them tightly around the top of the headband to secure the headpiece in place. I used a black headband, which blends in enough with my hair. If this isn’t the case for you, you can try painting the headband or wrapping it in brown fabric.DSC_0941Once your headpiece is securely held together, put it on and you’re completely pineappled! This costume really is an easy one to put together and you will certainly stand out at a party because I bet no one else would think of dressing up as fruit! Happy Halloween!

Halloween Decor: Painted Pumpkins

DSC_0980DSC_0937Only one more day til Halloween, which means only one more day for Halloween crafts! That’s the real tragedy, isn’t it? Well, when it gets this late and you’re looking for a last minute craft to decorate your home for Halloween, there’s nothing better than good ‘ol pumpkins.

While carving your pumpkins may the traditional route, painting them can be equally adorable and a little pop of color to your home. Instead of going with tradition this year, Andrew and I painted our pumpkins bright colors with fun patterns to brighten up the dining room, plus added some glitter to one to really make it pop. This is really easy and will even prolong the life of your pumpkins because they haven’t been carved!  DSC_0966DSC_0971Go ahead and get out of your pumpkin comfort zone! Paint them bright colors that aren’t necessarily “Halloweeny” and add patterns that YOU love. In our case, I painted a lavender pumpkin with gold herringbone lines one pumpkin, and Andrew painted his light blue with gold polkadots (he wasn’t really sure what was up with this whole “painting pumpkins” thing). Paint the stems a matching color for more uniformity and color! To decorate the small pumpkin, I covered it with Mod Podge and rolled it in a mixture of purple and silver glitter with a white painted stem.DSC_0965It may not be conventional, but they’re definitely more like me! Plus, I can keep them around after Halloween for a colorful table piece.

Halloween Decor: Paper Garland Curtain

DSC_1064 DSC_1106Despite having a cat who has to chase and attack anything that hangs or moves, I love having hanging decor (like these paper bats or floating candles). It’s a bit of a gamble having these in the house with Oliver, but I’ve been able to make it work so far by leaving them just a little too high for them to reach. He’s very upset about this.

With tradition of my love for hanging decorations, here’s another Halloween project that you can reuse from year to year and won’t cost you much at all. You might even have the supplies already in your closet. I made this stitched paper garland curtain to dangle from a tension rod at the opening of my small hallway. It turned out to be a perfect fit and a nice Halloween decoration that is well out of the reach of my cat (despite his best efforts).

Here’s what you need:

  • Tension rod
  • Black thread
  • 1 1/2 inch circle punch
  • Black and orange construction paper or cardstock

DSC_0943First, use the circle punch to cut out as many circles as you can from the black and orange paper. Use what you have – I had black construction paper and orange cardstock, so I worked with them. If you’re buying new supplies, construction paper would be easier to manage because it’s thinner and less expensive, but the cardstock does look a little nicer. I varied my pattern with two columns of black followed by one of orange because I had more black paper than orange, and I thought black had a spookier feel to it.DSC_0967 DSC_0970Once you have a whole bunch of circles, load your sewing machine with black thread, lower the needle into the bottom of one circle and begin to sew down the middle. Go slowly if you can and use a tight stitch. When you near the end of the circle, place down another, lifting the foot if needed, and continue to sew circles together until the garland is about 3 feet long (that’s up to you and the size of your doorjam). At the end of the garland, lift the needle and foot, and pull the thread so that you have at least 5 inches to cut away. You want this extra thread to tie the string to the tension rod, leaving a few inches between each string until your door jam is filled (I used 11 strands).DSC_1097 DSC_1036With that, your curtain is complete and you have a creative way to add Halloween decor to your home, and in my case, bring some excitement to my otherwise dull hallway. Happy Halloween and happy decorating!

Halloween Decor: Harry Potter Floating Candles

DSC_1102 DSC_1150If you’re familiar with Harry Potter, you probably remember the massive amount of floating candles in the Great Hall. Well, Andrew and I are pretty big Harry Potter geeks, so this floating candle craft turned out to be the perfect decoration for our first Halloween together in our apartment. It’s not too often that Andrew gets excited about crafts, but this one was actually HIS idea, and it came out wonderfully.

Here’s what you need:

  • Paper towel tubes (or wrapping paper tubes cut to size)
  • Clear fishing line
  • Clear thumbtacks
  • White colored paint
  • Cream colored paint
  • Hot glue gun
  • Short tea lights (the tall ones will be very difficult to hang)
  • White cardstock
  • Scissors
  • Clear glue

Paper towel rolls are the best size for these candles, but if you can’t gather enough (we made 7) you can also cut wrapping paper tubes to the size you want (just make sure they are big enough around to fit a tea light). Trace the bottom of the tubes onto a piece of white cardstock and cut out the circles. Use a clear but heavy duty glue to stick the circles to the bottom of each tube.

While the glue dries, paint the entire tube white and let it dry completely. It might need two coats. Once dry, use your glue gun to glue around the very top of the tube and drizzle it down the sides to give the appearance of dripping candle wax. Set aside to harden. One the hot glue is dry and hardened, paint over the drips with a cream colored paint – this will show off the contrast between the candle and the dripping wax.

Next is the hard part because you have to be kind of exact. Hold the tea light in the very top of the tube, where you will want it to sit inside of the candle, and measure where it ends. This is where your fishing line will cross and your light will balance on top of the line, so it’s important that you mark the exact point that you want your light to sit on top of.DSC_1140DSC_1158Using a sharp object like a thumbtack or safety pin, pole one hole on each side of the tube where you measured the bottom of your light. Thread the fishing line through the holes, leaving about 2-3 feet of line for the tube to hang from. Turn on your tea lights and set inside of the tubes, sitting on top of the string. Depending on size, it might not be a perfect fit, but that’s ok! You can use a little tape to hold it in place if needed, but you don’t want to glue the tea light to the tube because you will need to be able to turn it on and off.DSC_1106 DSC_1141Tie the ends of the fishing line to thumbtacks and carefully hang from the ceiling at varying heights. Turn off the lights and prepare to be amazed by the spooky Harry Potterness of these floating candles! We hung them above our dining room table, making our own (very little) Great Hall and creating a gorgeous ambiance. Enjoy!

Halloween Decor: Paper Bat Swarm

DSC_1122DSC_1136I’m a little behind on Halloween decorations this year, so this weekend I upped my game to get ready for our Halloween party this Friday. First up, I made this paper bat swarm in the corner of our living room with a combination of bats stuck to the wall and bats hanging from the ceiling. When it’s dark, it creates spooky shadows on the wall and when it’s light, well, it still creates spooky shadows on the wall.

This one’s pretty easy, and all you need is:

  • Several large pieces of black construction paper (way cheaper than cardstock)
  • Scissors
  • Pencil
  • Clear fishing line
  • Clear thumb tacks

First, fold each piece of paper in half. This makes the bat more symmetrical. Then sketch out half of the bat or, if you feel more comfortable, print out a stencil and trace it on to the paper. When you have at least ten bats, begin folding their wings to give them that “in flight” look. For mine, I folded down the very middle of the bat and twice down each wing, meeting at the wing tips.

DSC_1118DSC_1130DSC_1128Use double sided tape to adhere several of the bats to the wall, placing them facing upward so they look like they are flying. Tape toward the middle of the bat to allow the wings to show their shape.

Use a sharp point like a safety pin to poke holes in the middle fold of several of the other bats’ wings. Thread the end of the fishing line through the hole and tie several knots on the underside of the wing to hold it. Allow about 1-2 feet of line before cutting it. Do the same on the other wing and tie both ends of line securely to a clear thumbtack. You can also tie them separately, but I found it easier to hang with only one thumb tack per bat.

That’s all there is too it! Happy Halloween!